
The Xbox One controller is an essential piece of gaming equipment for millions of players worldwide. However, over time, controllers can accumulate dirt, suffer from drift issues, or require button replacements. If you’re looking to take apart your Xbox One controller to clean it, repair it, or even customize its parts, knowing the right techniques is crucial.
In this guide, we’ll walk you through everything you need to know about disassembling your Xbox One controller safely and efficiently. From cleaning the internal components to fixing common issues like joystick drift, this comprehensive tutorial will provide you with clear, actionable steps. Whether you’re a gamer looking to fix your controller or someone interested in customizing their Xbox controller, this guide will help you.
Why You Might Need to Take Apart Your Xbox One Controller
Taking apart an Xbox One controller is not something most players need to do regularly, but there are several scenarios where disassembly is necessary. Some of the common reasons to take apart your controller include:
• Cleaning: Over time, dirt, dust, and grime can build up inside the controller, especially around the buttons and joysticks. Disassembling it allows you to clean the internal components thoroughly.
• Fixing joystick drift: Joystick drift, where the controller registers movement without input, is a common issue that requires taking the controller apart to fix or replace the analog sticks.
• Button replacement or repair: If one of your buttons becomes unresponsive or sticks, you may need to take apart the controller to access and repair or replace the faulty button.
• Trigger issues: Sometimes, the triggers on an Xbox One controller may become unresponsive or malfunction. Taking apart the controller allows you to fix or replace the triggers.
• Customization: Some gamers like to customize their controllers with unique designs, buttons, or parts. Disassembling the controller gives you the ability to add custom parts.
• Firmware updates or hardware modifications: Advanced users might want to take apart their controller to install custom firmware or hardware modifications like better thumbsticks or upgraded internals.
Also Read:- How to Stain Concrete: A Complete Guide to Stunning, Durable Surfaces
How to Take Apart Xbox One Controller to Clean: A Thorough Guide
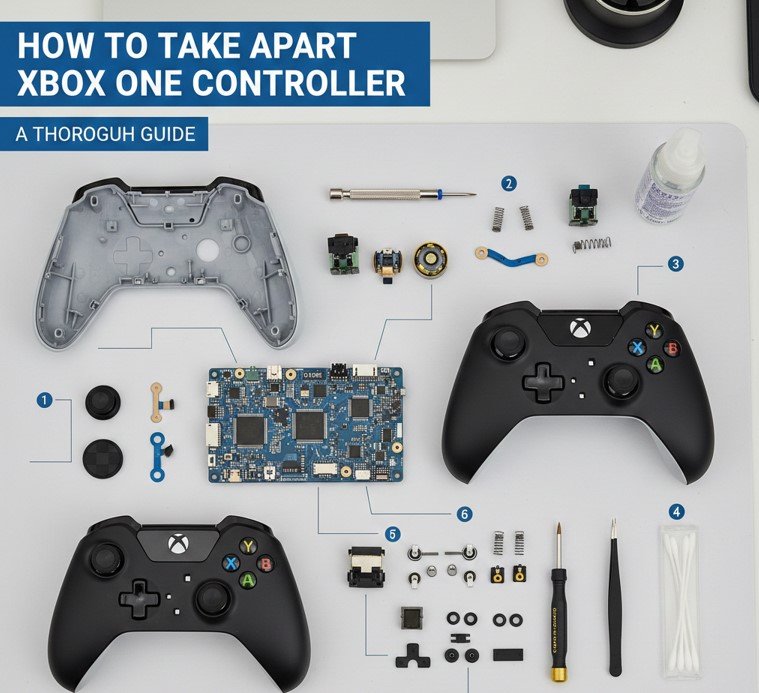
Cleaning your Xbox One controller is essential to keep it in optimal working condition. Over time, grime, dust, and oils from your fingers can get inside the controller, affecting performance and comfort. Taking apart the controller is the most effective way to clean it thoroughly.
• Unplug and power off the controller
Ensure that your controller is powered off and disconnected from any device. If you’re using a wired controller, unplug the cable. This is essential for your safety during disassembly.
• Remove the screws
You will need a T8 Torx screwdriver to remove the screws from the back of the controller. There are a total of 7 screws: six around the outer edges and one under the battery compartment. Be sure to keep track of the screws for reassembly.
• Separate the back and front panels
Once the screws are removed, gently separate the front and back panels. Start from one edge and carefully lift the two halves apart. Be cautious not to force it, as the internal ribbon cables can be delicate.
• Clean the interior components
Using a microfiber cloth or a soft brush, gently clean the internal components, including the buttons, joysticks, and triggers. You can use compressed air to blow out dust or debris from tight spaces.
• Wipe down the exterior
Before reassembling the controller, wipe down the exterior of the front and back panels with a clean cloth. Make sure no fingerprints or grime are left on the surface.
• Reassemble the controller
Once the internal and external parts are clean, carefully snap the front and back panels back together. Reinsert and tighten all the screws to ensure the controller is secure.
Also Read:- How to Curl Hair: The Complete Guide for Every Technique
How to Take Apart Xbox One Controller Without Tools: A Quick Method
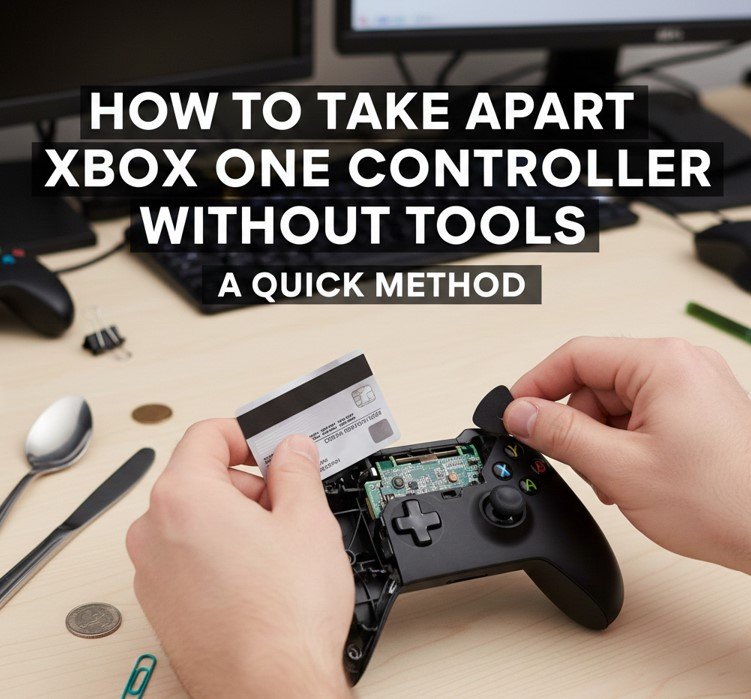
Sometimes, you may need to take apart an Xbox One controller for quick fixes but don’t have the necessary tools, like a Torx screwdriver. While it’s not recommended for in-depth repairs, here’s a method you can use to open the controller without special tools.
• Remove the battery pack
Start by removing the battery or the rechargeable battery pack. This ensures there’s no power running through the controller while you’re handling it.
• Pry the controller open carefully
Use a plastic prying tool (or a flathead screwdriver wrapped in a soft cloth to prevent damage) to gently pry apart the controller at the seams. Insert the prying tool into the gap between the front and back panels and work your way around the controller.
• Focus on the edges
The seams on the sides and bottom of the controller are the weakest points where you can start prying. Be patient and don’t force it to avoid cracking the plastic.
• Lift the front and back panels
Once you’ve loosened the sides, gently lift the front panel away from the back panel. The controller will be held together by a few clips, which can be released by carefully prying them apart.
• Avoid damaging internal components
Without tools, it can be tricky to access internal components safely, so avoid putting excessive pressure on parts like the buttons, joysticks, and ribbon cables.
• Reassemble carefully
Once you’ve completed your task, carefully snap the front and back panels back together. If you removed any components, be sure to put them back in the correct order and secure them as best as possible.
Also Read:- How to Splice Wires: The Ultimate Guide for Safe and Effective Wire Splicing
How to Take Apart Xbox One Controller to Clean Buttons: Button Repair and Cleaning Tips
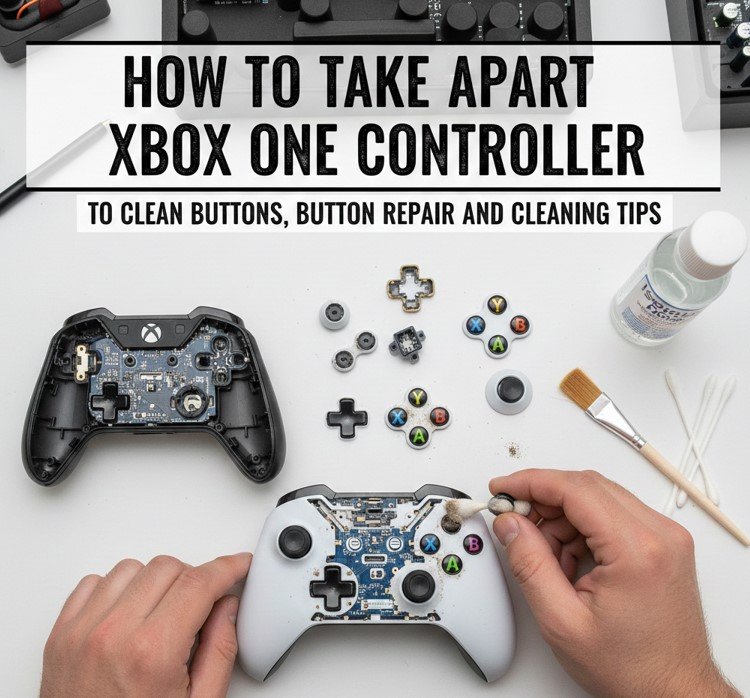
If your Xbox One controller’s buttons are sticky, unresponsive, or need cleaning, it’s essential to take apart the controller to access the internal button components. Here’s how to clean and repair buttons:
• Disassemble the controller
Follow the steps above to remove the screws and separate the front and back panels of your Xbox One controller.
• Remove the button assemblies
Once the controller is open, locate the button assemblies. The buttons are typically mounted to small plastic domes inside the controller. Gently remove them and set them aside.
• Clean the button contacts
Use a microfiber cloth or cotton swab with rubbing alcohol to clean the button contacts. Gently wipe off any dirt or grime that may have built up on the internal components.
• Inspect for damage
Check the buttons and surrounding areas for any visible damage. If the buttons are sticky, it could be due to debris or residue. In this case, cleaning should restore functionality.
• Lubricate the button components
Apply a small amount of silicone-based lubricant to the button contacts. Be sure to use a minimal amount to avoid excess grease that could attract more dust or dirt.
• Reassemble the controller
Once the buttons are clean and dry, carefully place them back into their respective slots. Reassemble the front and back panels and tighten all screws to secure the controller.
Also Read:- How to Send Certified Mail: A Complete Step-by-Step Guide
How to Take Apart Xbox One Controller Triggers: Trigger Repairs and Maintenance

The triggers on your Xbox One controller are vital for gameplay, especially in racing or shooter games. If your triggers feel unresponsive or sticky, you may need to disassemble the controller to fix or replace them.
• Remove the screws and separate the halves
Use a T8 Torx screwdriver to remove the screws and carefully separate the front and back panels of the controller, as described earlier.
• Locate the triggers
Inside the controller, the triggers are mounted on a set of small plastic gears and springs. Carefully observe the mechanism, as it can be delicate.
• Clean the trigger components
If your triggers are sticky, dirt or grime might be causing the issue. Use a cotton swab dipped in rubbing alcohol to clean around the springs and pivot points. Allow the components to dry fully before reassembly.
• Check for damage
Inspect the triggers for any cracks or wear. If the triggers appear broken or worn out, you may need to replace them with new parts.
• Lubricate the trigger mechanism
For smoother trigger action, you can apply a small amount of silicone lubricant to the trigger mechanism. Avoid using too much, as excess lubricant can attract dust.
• Reassemble the controller
After cleaning and fixing the triggers, carefully reassemble the controller, ensuring that the triggers are seated properly before securing the panels and screws.
Also Read:- How to Reset Firestick Remote: Complete Step-by-Step Guide
How to Take Apart Xbox One Controller White: Disassembly for Customization
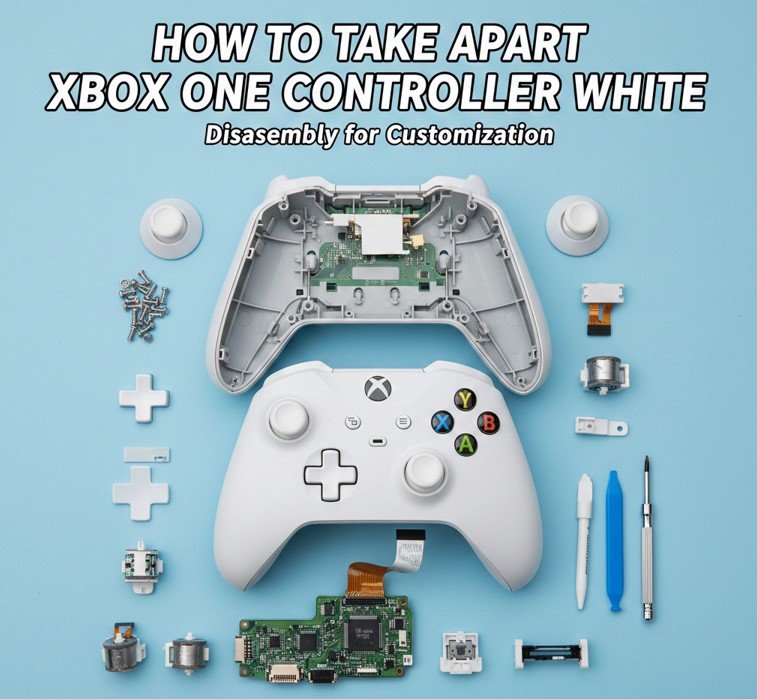
If you have a white Xbox One controller or are looking to customize one, taking apart the controller is the first step toward making modifications, whether it’s for aesthetics or functionality.
• Remove the screws
To begin disassembling the white controller, use a T8 Torx screwdriver to remove all the screws, including the ones under the battery compartment.
• Separate the front and back panels
After removing the screws, gently separate the front and back panels. Since white controllers are often designed with precise fitment, take extra care when opening them to avoid scratching or cracking the plastic.
• Check for custom parts
If you’re replacing parts like thumbsticks or buttons, remove the existing components and replace them with new custom options. Make sure the parts fit properly and securely.
• Clean internal components
For a cleaner look and feel, you can use microfiber cloths to wipe down internal parts. If you’re adding custom parts like LED lights, now is the time to install them.
• Reassemble the controller
Once the customizations are done, reassemble the controller by carefully aligning the front and back panels. Tighten the screws securely to ensure everything is in place.
• Test functionality
Before using the controller, make sure all customizations work as expected, and test all buttons and triggers to ensure they are responsive.
Also Read:- How to Remove Plaque from Teeth: A Complete Guide
How to Take Apart Xbox One Controller to Fix Drift: Resolving Joystick Drift
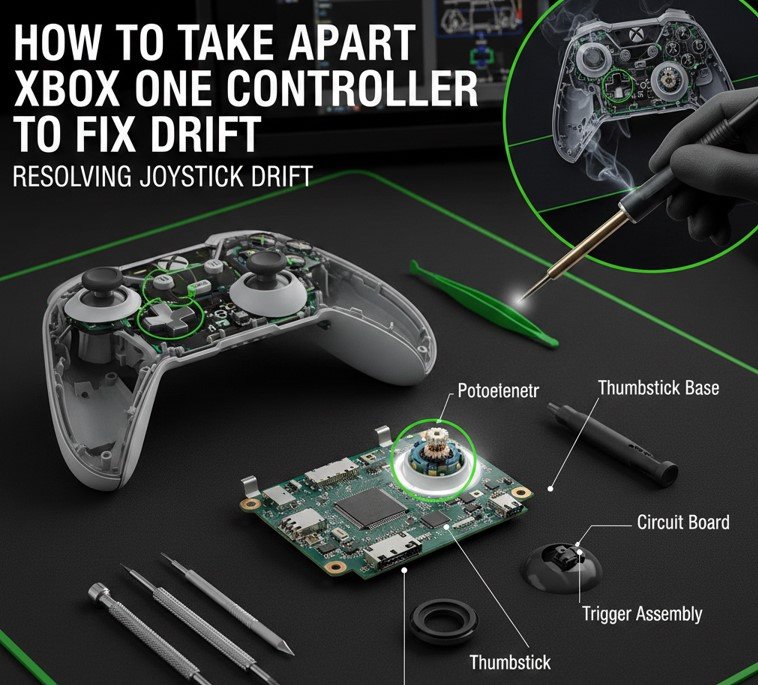
Joystick drift is a common issue that many Xbox One controller users face. This occurs when the joysticks register movement even when they’re not being touched. Taking apart the controller is often necessary to fix or replace the analog sticks.
• Disassemble the controller
As always, start by removing the screws and carefully separating the front and back panels of the controller. Be cautious not to damage any internal components.
• Inspect the analog sticks
The joystick drift issue usually originates from the internal potentiometers or worn-out analog sticks. Inspect these parts for wear or dirt buildup.
• Clean the potentiometers
Use a can of compressed air or a soft brush to clean the potentiometers inside the controller. This can help remove any debris causing the drift.
• Replace the analog sticks
If cleaning doesn’t resolve the drift, you may need to replace the analog sticks or the internal potentiometer sensors. Replacement parts can be found online, and installing them is usually straightforward.
• Reassemble the controller
After replacing the faulty parts, reassemble the controller carefully. Ensure all internal components are in place and secure before reattaching the back panel.
• Test for drift
Once you’ve reassembled the controller, test it by playing a game or using the controller on your Xbox to ensure that the drift issue has been resolved.
Also Read:- How to Cook Boudin: The Complete Cajun Cooking Guide for Perfect Results
Conclusion
Learning how to take apart your Xbox One controller can be a rewarding skill, whether you’re cleaning it, fixing joystick drift, or customizing your controller with new parts. By following the detailed steps outlined above, you can ensure that your controller is in top condition and performing at its best.
Taking apart your controller allows you to address issues like sticky buttons, malfunctioning triggers, and joystick drift. By following proper disassembly techniques and using the right tools, you can enhance the longevity of your Xbox One controller and even create a more personalized gaming experience.
FAQs
What tools do I need to take apart my Xbox One controller?
You will need a T8 Torx screwdriver to remove the screws and a plastic prying tool for safely separating the panels.
How do I fix joystick drift in my Xbox One controller?
To fix joystick drift, you can clean the internal components or replace the analog sticks and potentiometer sensors if necessary.
Can I take apart my Xbox One controller without tools?
While it’s possible to pry the controller open without tools, it’s not recommended for in-depth repairs. Tools ensure you don’t damage the controller.
How often should I clean my Xbox One controller?
It’s a good idea to clean your controller every few months or whenever you notice dirt or sticky buttons. Regular cleaning helps maintain optimal performance.
Can I customize my Xbox One controller after taking it apart?
Yes, disassembling your Xbox One controller allows you to replace parts like buttons, thumbsticks, or even add LEDs for a custom look.
For More Update Visit: VallayTaxNv