
If your Keurig coffee maker has started brewing slowly, producing lukewarm coffee, or leaving a strange taste behind, mineral buildup is likely the problem. Learning how to descale Keurig machines properly is one of the most important maintenance steps for ensuring consistent flavor, optimal brewing performance, and long appliance lifespan.
Descaling removes calcium and lime deposits that accumulate inside the internal water lines over time, especially in areas with hard water. Ignoring this buildup doesn’t just affect taste — it can damage heating elements and cause error messages or system failure. This guide explains how to descale Keurig with vinegar, how to descale Keurig Slim, Keurig Duo, and any Keurig coffee maker, using safe, proven, and manufacturer-aligned techniques.
Why Descaling a Keurig Is Essential
Keurig machines heat water rapidly, and whenever water is heated, dissolved minerals are left behind. Over time, these minerals form scale deposits inside the machine’s internal components. According to appliance maintenance data, scale buildup can reduce heating efficiency by up to 25%, directly impacting brew temperature and extraction quality.
Regular descaling improves coffee flavor, restores proper water flow, and prevents internal blockages. Keurig recommends descaling every 3–6 months, depending on water hardness and usage frequency. Users who brew multiple cups daily may need to descale even more often to maintain performance.
How to Descale Keurig With Vinegar
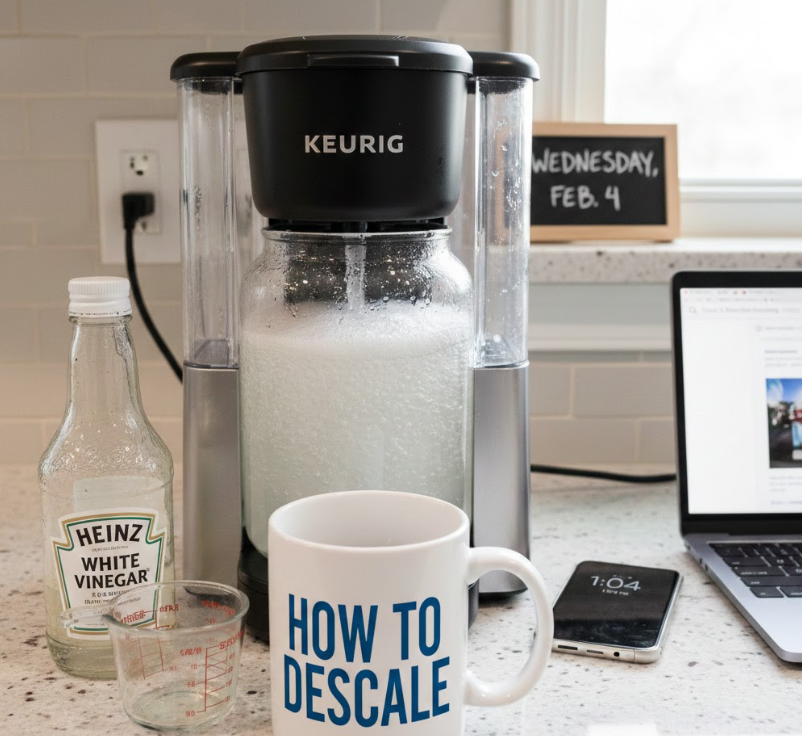
Using vinegar is one of the most common and cost-effective ways to descale a Keurig. White distilled vinegar contains acetic acid, which dissolves mineral buildup safely when used correctly.
• Why Vinegar Works for Descaling
Vinegar’s acidity breaks down calcium carbonate deposits without damaging internal tubing. When diluted properly, it cleans effectively while remaining safe for household appliances.
• Preparing the Vinegar Solution
Mix equal parts white distilled vinegar and water. This balance ensures sufficient acidity without leaving overpowering residue or odor inside the machine.
• Running the Descaling Cycle
Pour the solution into the water reservoir and brew without inserting a K-Cup. Run multiple brew cycles until the reservoir empties, allowing vinegar to circulate through all internal components.
• Pausing for Maximum Effectiveness
Let the machine sit for 30 minutes midway through the process. This soaking period allows vinegar to dissolve stubborn scale buildup more thoroughly.
• Rinsing Thoroughly After Descaling
Flush the machine with fresh water for several cycles to remove vinegar taste and odor completely. Skipping this step can affect coffee flavor.
• When Vinegar Is Not Recommended
Some newer Keurig models advise using official descaling solutions instead of vinegar. Always check your user manual before proceeding.
Also Read:- How to Bake Salmon: A Complete Guide to Perfect Oven-Baked Salmon
How to Descale Keurig Slim
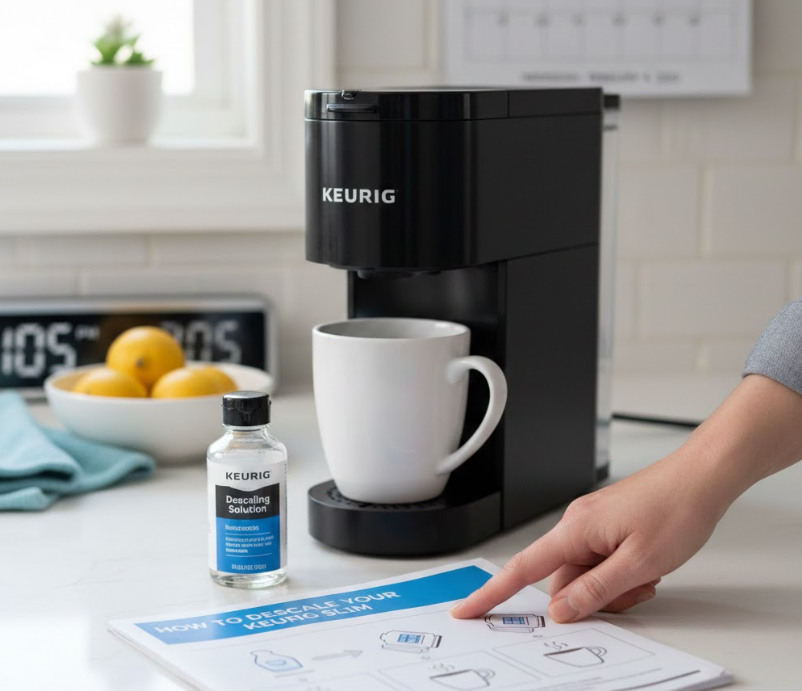
The Keurig Slim is designed for compact spaces, but its narrow water lines make regular descaling even more important to prevent clogs.
• Understanding Keurig Slim Design
The Slim model uses a smaller reservoir and tighter internal tubing, which means mineral buildup can impact performance faster than in larger machines.
• Entering Descale Mode
Many Keurig Slim models include a descale indicator light. Activating descale mode ensures the machine follows the correct cleaning cycle.
• Choosing the Right Descaling Solution
Keurig’s official descaling solution is recommended for Slim models to avoid internal residue and maintain warranty compliance.
• Running Continuous Brew Cycles
Because of the smaller reservoir, multiple refills may be required. Consistency is key to fully flushing mineral deposits.
• Rinse Cycle Importance
Running fresh water cycles until no taste remains is critical, especially with compact machines where residue lingers longer.
• Preventing Future Scale Issues
Using filtered or bottled water significantly reduces mineral buildup and extends time between descaling cycles.
Also Read:- How to Lower Body Fat Percentage: A Complete Science-Backed Guide
How to Descale Keurig Duo
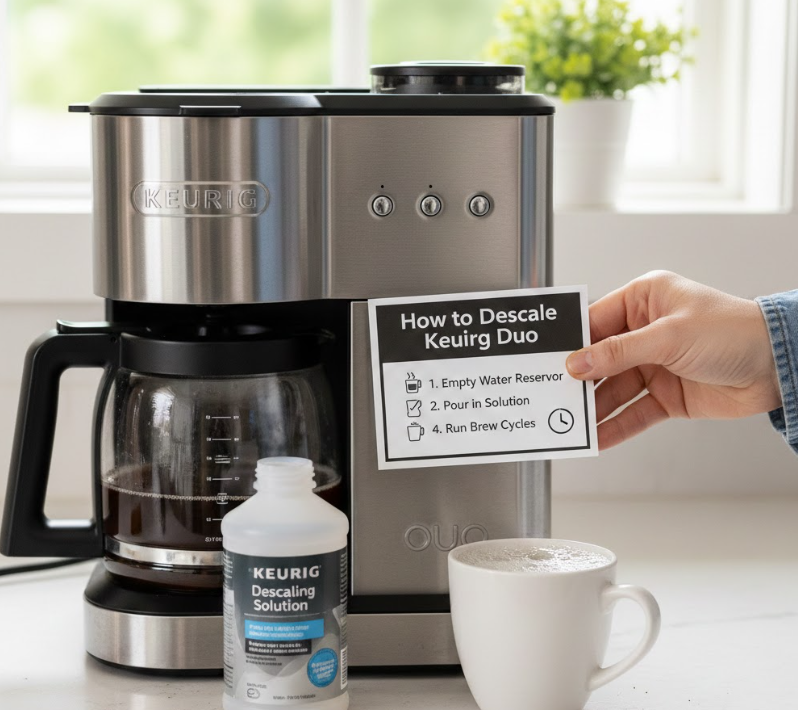
The Keurig Duo brews both single-serve cups and full carafes, making its internal system more complex and more prone to mineral accumulation.
• Why Duo Models Need Special Attention
Dual brewing pathways mean scale can build up unevenly if not properly flushed through both systems.
• Preparing Both Brew Paths
Ensure both the single-serve and carafe sides are empty before starting the descaling process.
• Running Descale Cycles Correctly
Alternate between cup brewing and carafe brewing to ensure descaling solution reaches all internal components.
• Extended Soaking Period
Allowing the solution to sit longer in Duo machines improves effectiveness due to additional internal pathways.
• Multiple Rinse Cycles Required
Duo machines typically need more rinse cycles than standard models to remove residual solution.
• Post-Descale Performance Check
Brew plain water through both sides to confirm proper flow, temperature, and taste restoration.
Also Read:- How Long Does It Take to Build a House? A Complete Timeline Guide
How to Descale Keurig Coffee Maker (All Models)

This general method applies to most Keurig coffee makers and serves as a universal maintenance guide.
• Identifying When Descaling Is Needed
Slow brewing, unusual noises, incomplete cups, and descale lights all indicate mineral buildup.
• Choosing Descaling Solution Options
Official Keurig descaling solution, vinegar, or citric acid solutions can be used depending on model compatibility.
• Step-by-Step Universal Process
Empty reservoir, add solution, run brew cycles without K-Cups, pause for soaking, then rinse thoroughly.
• Importance of Water Quality
Hard water accelerates scale buildup. Using filtered water reduces frequency of descaling needs.
• Frequency Recommendations
Most households should descale every 3 months. Heavy users may need monthly maintenance.
• Long-Term Machine Protection
Routine descaling extends heating element life and prevents costly repairs or replacements.
Also Read:- How to Build a PC: The Complete Expert Guide for Beginners and Enthusiasts
Common Descaling Mistakes to Avoid
• Skipping rinse cycles
• Using flavored or apple cider vinegar
• Descaling only once per year
• Ignoring descale indicator lights
• Using abrasive cleaning agents
• Brewing coffee immediately after descaling
Avoiding these mistakes ensures safe, effective cleaning.
Health and Taste Benefits of Regular Descaling
• Better coffee flavor extraction
• Consistent brewing temperature
• Reduced bacterial growth risk
• Improved water flow
• Longer machine lifespan
• Manufacturer-recommended maintenance.
Also Read:- How to Ask for a Raise: A Complete Expert Guide to Getting Paid What You Deserve
Conclusion
Understanding how to descale Keurig machines is essential for maintaining coffee quality, brewing efficiency, and appliance longevity. Whether you use vinegar, official descaling solution, or maintain a Keurig Slim, Duo, or standard coffee maker, regular descaling prevents mineral buildup from damaging internal components.
By following the techniques outlined in this guide and maintaining a consistent cleaning schedule, you ensure that every cup of coffee tastes fresh, brews properly, and meets the standards Keurig machines are designed to deliver.
FAQs
How often should I descale my Keurig?
Every 3–6 months depending on usage and water hardness.
Can I use vinegar instead of descaling solution?
Yes, unless your specific model advises against it.
Why does my Keurig still say “descale” after cleaning?
Some models require completing a full rinse cycle to reset the indicator.
Is descaling safe for all Keurig models?
Yes, when done according to manufacturer guidelines.
For More Update Visit: VallayTaxNv