")
If you’re wondering how to transfer photos from iPhone to computer, you’re not alone. Millions of users capture high-resolution images daily, and with iPhones now capable of shooting 48MP photos and 4K videos, storage fills up fast. Backing up and transferring photos to your computer ensures safety, frees up space, and keeps your memories organized.
Whether you want to use a USB cable, transfer wirelessly, avoid iCloud, or try Bluetooth, this in-depth guide explains every method step by step. You’ll learn:
- How to transfer photos from iPhone to computer with USB
- How to transfer photos from iPhone to computer without USB
- How to transfer photos from iPhone to computer via Bluetooth
- How to transfer photos from iPhone to computer without iCloud
This article follows best practices for data security, Apple ecosystem compatibility, and Windows/macOS integration — all written with clarity, accuracy, and user-first value.
Why You Should Transfer Photos from iPhone to Computer
Before diving into the methods, it’s important to understand why learning how to transfer photos from iPhone to computer is essential.
1. Free Up Storage Space
Modern iPhones shoot high-resolution images and ProRAW files. A single photo can take 5–75MB depending on format. Over time:
- Storage fills quickly
- Performance may slow
- iCloud storage limits get reached
Transferring photos to a computer ensures your device remains optimized.
2. Create a Secure Backup
While Apple provides iCloud backup, local backups add an extra layer of protection. Hard drive storage reduces dependency on cloud subscriptions.
3. Better Photo Management
On a computer, you can:
- Organize folders
- Edit in professional software
- Archive by date or event
Applications like Adobe Lightroom or Photos offer advanced editing features unavailable on mobile.
Also Read:- How to Make a Roux: The Ultimate Guide for Perfect Sauces and Gravies
How to Transfer Photos from iPhone to Computer with USB
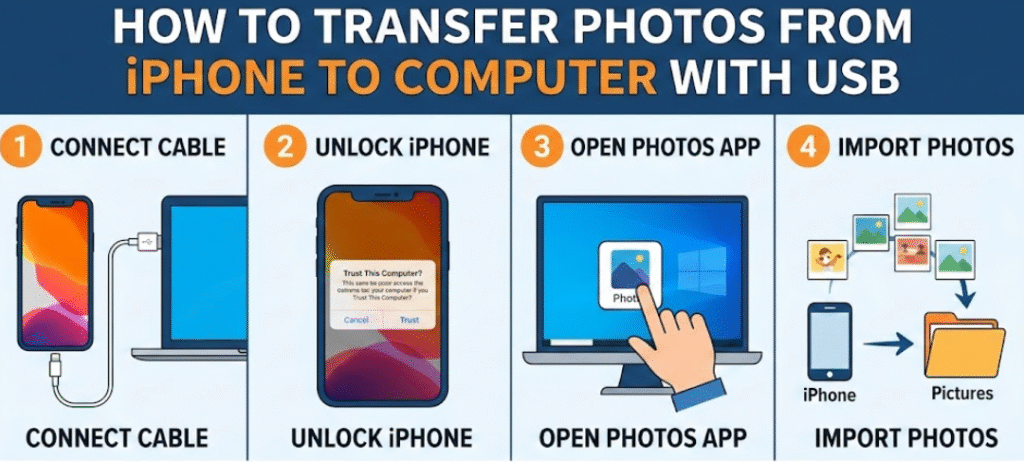
Using a USB cable remains the fastest and most reliable method.
Method 1: Transfer Photos to Windows PC Using USB
If you use Windows:
Step-by-Step Guide:
- Connect your iPhone to your PC using a Lightning cable.
- Unlock your iPhone and tap “Trust This Computer.”
- Open File Explorer.
- Click on “This PC.”
- Select your iPhone device.
- Open the DCIM folder.
- Copy and paste photos to your desired folder.
Why USB Is Recommended
- Fast transfer speeds
- No internet required
- Stable connection
- Works without iCloud
- Ideal for large video files
- Minimal compression
Windows may require iTunes installed for driver support, though newer Windows versions detect iPhones automatically.
Method 2: Transfer Photos to Mac Using USB
If you’re using a Mac:
- Connect your iPhone via cable.
- Open the Photos app.
- Select your device from the sidebar.
- Choose photos to import.
- Click “Import Selected” or “Import All.”
Mac users can also use Image Capture for more control.
Advantages for Mac Users
- Seamless Apple ecosystem integration
- Faster metadata recognition
- Direct photo library sync
- Automatic album creation
- High-resolution preservation
- No additional drivers required
USB remains the most secure and efficient answer to how to transfer photos from iPhone to computer for large libraries.
Also Read:- How to Cook a Ham: The Complete Guide for Oven, Crock Pot, Roaster, and Ham Steak
How to Transfer Photos from iPhone to Computer Without USB
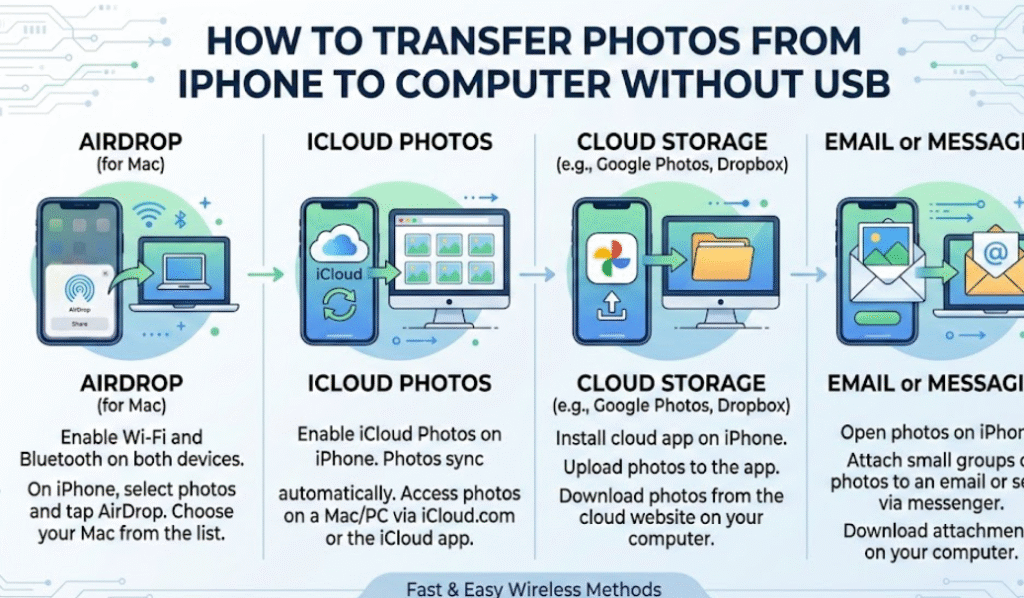
If you don’t have a cable, wireless methods work effectively.
Method 1: Using iCloud (Wireless Sync)
iCloud allows automatic syncing.
Steps:
- Enable iCloud Photos on your iPhone.
- Visit iCloud.com on your computer.
- Log in with your Apple ID.
- Download selected photos.
Benefits
- Automatic sync
- No physical connection
- Cross-device access
- Secure encryption
- Easy sharing
- Works globally
However, storage is limited to 5GB free.
Method 2: AirDrop (Mac Only)
AirDrop allows direct wireless transfer.
Steps:
- Enable AirDrop on both devices.
- Select photos on iPhone.
- Tap Share → AirDrop.
- Select your Mac.
Why AirDrop Is Powerful
- Instant transfer
- No compression
- No cloud upload
- Secure encryption
- Fast over Wi-Fi Direct
- Ideal for smaller batches
Method 3: Email or Messaging Apps
For a few photos:
- Email attachments
- Send via WhatsApp Web
- Upload to Google Drive
This method may compress images.
Also Read:- How to Cite a Book: The Complete Academic Guide for MLA, APA, and Research Papers
How to Transfer Photos from iPhone to Computer via Bluetooth
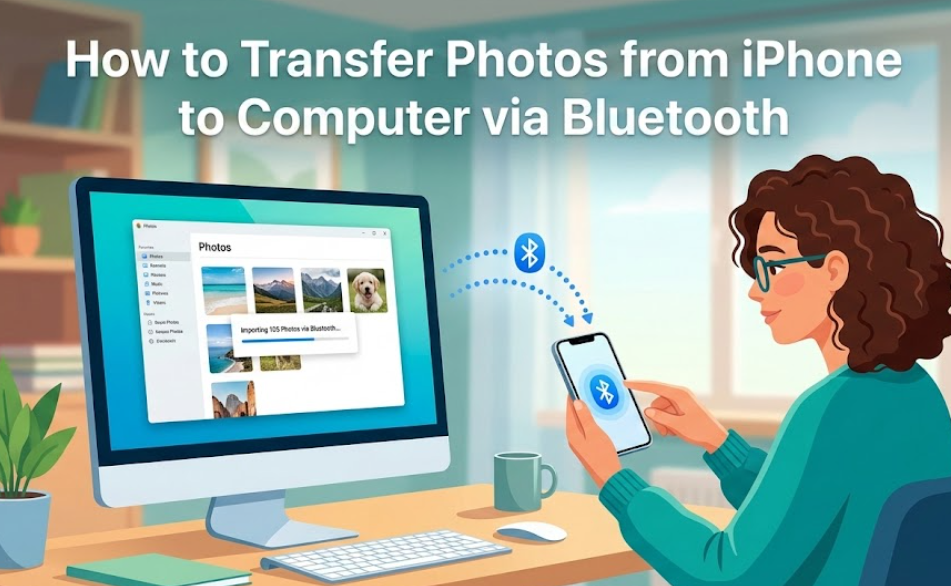
Bluetooth is possible but not ideal.
Unlike Android, iPhones do not support standard Bluetooth file transfer to Windows directly.
Bluetooth with Mac
On Mac:
- Turn on Bluetooth
- Enable sharing
- Use AirDrop instead (preferred)
Bluetooth is slower and limited compared to Wi-Fi methods.
Why Bluetooth Is Not Recommended
- Slow speed
- Limited file size
- Possible compatibility issues
- Not supported natively on Windows for iPhone
- Interrupted transfers
- No batch efficiency
Bluetooth is generally the least efficient solution when considering how to transfer photos from iPhone to computer.
Also Read:- How to Press Flowers: A Complete Step-by-Step Guide
How to Transfer Photos from iPhone to Computer Without iCloud
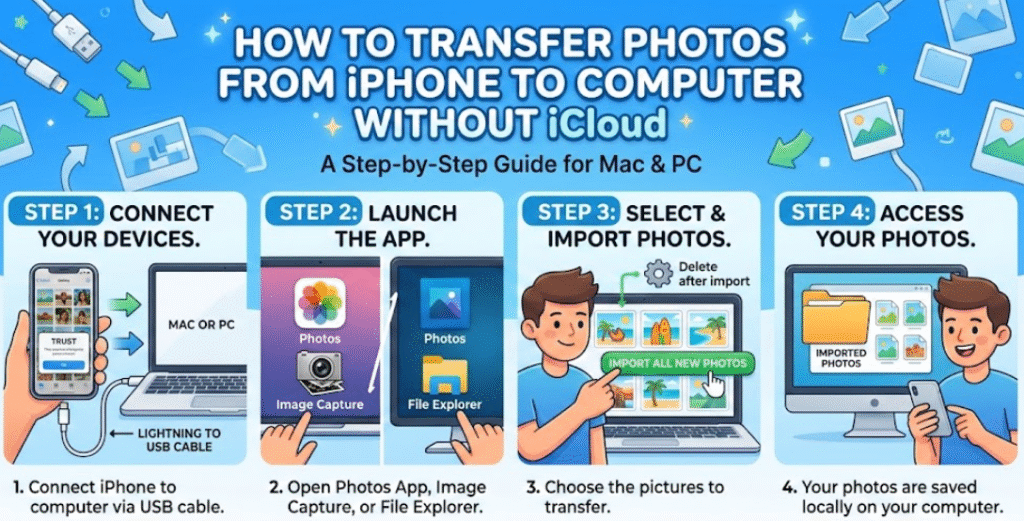
Some users prefer avoiding iCloud for privacy or storage reasons.
Here are reliable alternatives.
Option 1: USB Manual Transfer
Best option without iCloud.
- Full control
- No cloud dependency
- No subscription
- Works offline
- Faster large file transfer
- Secure local storage
Option 2: Third-Party Transfer Software
Programs like:
- AnyTrans
- iMazing
These offer:
- Selective transfer
- Backup customization
- Folder structuring
- HEIC to JPG conversion
- Metadata retention
- Duplicate detection
Option 3: Google Photos Backup
Google Photos provides cloud syncing alternative.
Upload from iPhone → Download to computer.
Note: May compress unless original quality is selected.
Common Problems and Solutions
1. iPhone Not Showing on Computer
- Update iTunes
- Change cable
- Restart devices
2. HEIC Format Issues
Windows may not open HEIC files.
Solution:
Install HEIC codec from Microsoft Store.
Security and Privacy Best Practices
When learning how to transfer photos from iPhone to computer, keep these safety tips in mind:
- Always use official cables
- Avoid public computers
- Use encrypted backups
- Log out from shared PCs
- Enable two-factor authentication
- Regularly update devices
Apple encrypts device-to-device transfer protocols, enhancing security.
Also Read:- How to Paint Kitchen Cabinets: Complete Step-by-Step Guide for a Professional Finish
Conclusion
Understanding how to transfer photos from iPhone to computer gives you full control over your digital memories. Whether you choose USB for speed, iCloud for automation, AirDrop for convenience, or third-party software for flexibility, each method serves different needs.
For most users:
- USB is best for large libraries
- AirDrop works great for Mac users
- iCloud is convenient but subscription-based
- Bluetooth is limited and slow
- Manual transfer avoids cloud dependency
Choose the method that aligns with your storage goals, privacy preferences, and workflow.
Frequently Asked Questions
What is the fastest way to transfer photos from iPhone to computer?
Using a USB cable provides the fastest speed and most reliable connection.
Can I transfer photos without iCloud?
Yes, USB transfer and third-party software allow full transfer without iCloud.
Why won’t my PC recognize my iPhone?
Ensure you tap “Trust This Computer” and install necessary drivers.
Does transferring photos reduce quality?
No, USB and AirDrop preserve original quality. Some cloud services may compress
For More Update Visit: VallayTaxNv